Every screen printer has their own journey into the craft. Some are drawn to it as a way to launch their own clothing line, while others see it as a business opportunity. No matter the reason, screen printing involves a detailed process that takes time to master. This guide breaks down the essential steps to successfully screen print t-shirts.
Preparing the Artwork
Before printing a t-shirt, a design is essential. Whether it’s an original creation or provided by a customer, all screen printing begins with artwork. The quality of the artwork directly impacts the final result—clear, high-resolution designs produce better prints.
Since screen printing applies one color at a time, each color in a design must be separated to create individual screens. Graphic design software is often used to clean up, adjust, and separate colors for a smooth printing process. If you’re new to designing, there are many resources available to help you learn how to create and refine artwork for screen printing. Additionally, various design tools like texture packs, fonts, and brushes can help enhance your creations.
Printing Film Positives
Once the artwork is finalized and the colors are separated, the next step is to create a film positive. This is a transparent sheet with the design printed in black ink, which will later be used to transfer the image onto a screen.
There are multiple ways to create film positives. You can print them using a specialized printer, have them produced by a local print shop, or even hand-draw them on transparency film. Choosing the right method depends on available resources and the level of detail required for the design.
Exposing the Image onto a Screen
After preparing the film positive, it’s time to transfer the design onto a screen. A screen printing frame consists of a mesh fabric stretched over a wooden or aluminum frame. Ink passes through this mesh to create the print, but first, the screen needs to be coated with a light-sensitive emulsion. Before applying the emulsion, the mesh should be thoroughly cleaned with a degreaser to remove dust or debris that could cause imperfections in the final print.
Once the emulsion is applied and dried in a light-safe environment, the film positive is placed onto the screen. Using an exposure unit or a specialized light source, the screen is exposed for a set amount of time. The areas of emulsion exposed to light harden, while the sections covered by the design remain soft. Rinsing the screen with water removes the unexposed emulsion, leaving open areas in the mesh where ink will pass through to create the final print.
Perfecting Exposure Times
Achieving the right exposure time is key to producing high-quality screens. If you’re new to this process, there are various guides and tutorials available to help you fine-tune exposure settings and improve screen preparation techniques.
For those looking to refine their skills further, advanced techniques can help optimize coating, drying, and exposure for professional results. Mastering these steps ensures a smooth printing process and high-quality, long-lasting designs on t-shirts.
Setting Up a Screen Printing Press
Before starting the screen printing process, it’s essential to properly set up the screens on the printing press. A screen printing press consists of a base with printing platens and multiple color arms. The size of the press varies—some manual presses handle a single color and station, while others can accommodate multiple colors and stations, increasing efficiency and print capacity. A press with more color arms allows for printing multi-color designs, and additional stations enable faster production.
Before securing the screens in place, apply screen printing tape around the edges of the frame. This prevents ink from seeping into unwanted areas. For multi-color prints, proper registration ensures that each color aligns correctly. Presses with micro-registration features or laser-guided systems help achieve precision, especially when working with detailed designs. Always conduct a test print before beginning full production to verify alignment and print quality.
Printing the Design onto T-Shirts
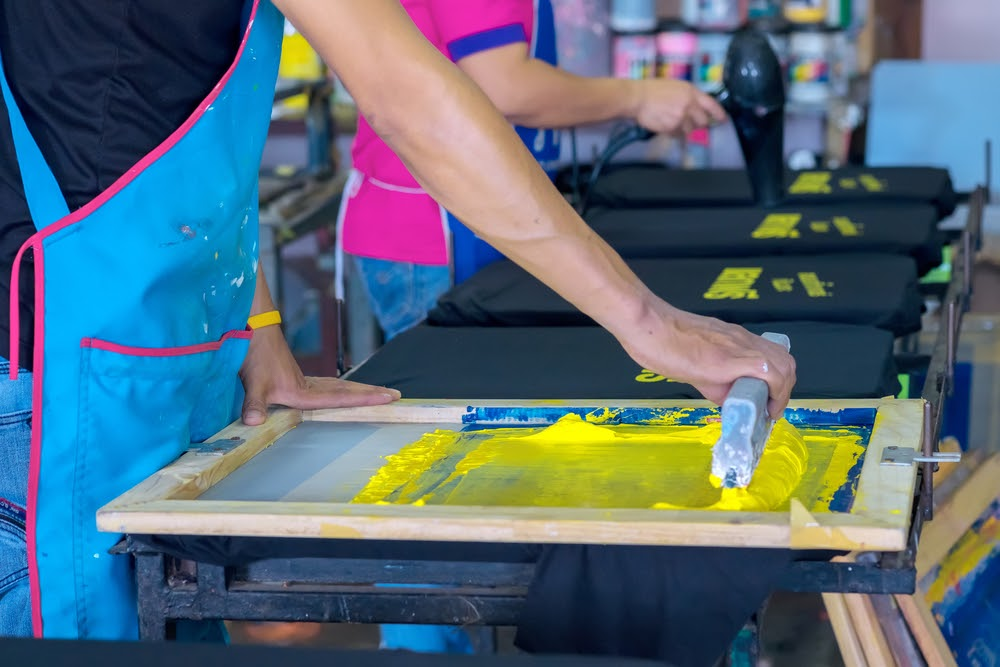
Before placing a shirt on the platen, apply a layer of adhesive to keep the fabric in place during printing. Once the shirt is positioned, align the printhead and flood the screen with ink before pressing it down onto the fabric. Using a squeegee, push or pull the ink across the screen to transfer the design onto the garment. Depending on ink coverage, multiple passes may be necessary. If printing a multi-color design, repeat the process with additional screens, ensuring proper alignment between each layer.
For designs requiring multiple ink layers, a flash dryer may be needed between prints, particularly when using a white underbase on dark garments. Flash drying temporarily sets the ink, allowing for additional layers without smudging. After the final print is applied, curing the design is essential. Ink must be heated to a specific temperature to fully bond with the fabric. This can be done using a conveyor dryer or flash dryer, with curing temperatures varying depending on the ink type.
To check if a print has been properly cured, perform a stretch test and wash test. A properly cured design should not crack, peel, or fade after washing. Using tools like a laser temperature gun or a temperature probe can help monitor ink curing during the process.
Mastering the Art of Screen Printing
Screen printing involves many factors, from choosing the right mesh count and emulsion to selecting the appropriate ink and squeegee. Troubleshooting printing issues, refining techniques, and optimizing shop setup are all part of mastering the craft. While it can be challenging, screen printing is also a rewarding and ever-evolving skill. With continued practice and learning, printers can refine their techniques to produce high-quality, long-lasting designs.


